Lea Strength Tester: A Step-by-Step Guide
Last updated on September 3rd, 2023 at 11:00 am
The lea tester is operating on constant rate of extension (CRE) principle, in particular pendulum type.
Description of Lea Tester
It is a motor driven, pendulum type lea tester. It consists of an upper jaw and a lower jaw. The lower jaw can be engaged with a screw mechanism, which is driven at a constant speed by a motor. Thus a constant rate of traverse of 12 inches/minute is given to the bottom jaw. The top jaw is connected to a pendulum arm by means of a steel tape.
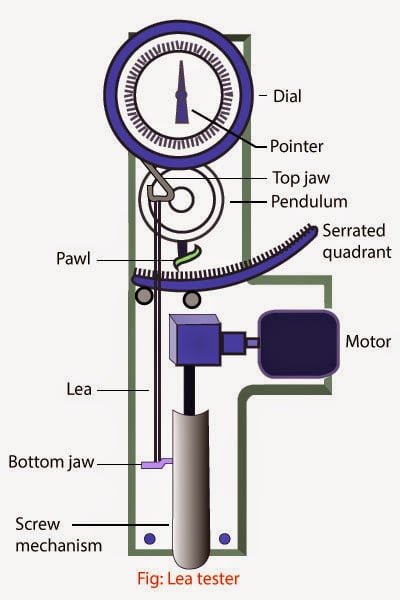
A heavy bob is attached to the pendulum arm and the arm moves over a serrated quadrant. A pawl is attached to the pendulum arm to control the movement of the arm and helps the arm to stop when the lea breaks. There is a dial, calibrated in pounds, over which a pointer moves through the geared movement of the pendulum arm. The pointer indicates the lea strength in pounds on the dial.
Working Principle of Lea Tester
Samples of lea are prepared from the ring bobbins or cones using wrap reel. The length of the lea is 120 yards. The bobbins are reeled under the same tension and with a small traverse to separate the layers. When the set length is wound, the reel automatically stops and the lea is transferred from the wrap reel to the lea tester.
The lea is mounted over the jaws and when in doing so, care should be taken to avoid the formation of any twist in the lea and the grapping of threads on the jaws.
Then the bottom jaw is engaged with the screw mechanism and the motor is switched on. As the bottom jaw descends, a load is imposed on the loops of yarn constituting the lea.
Because of the pull on the upper jaw, the pendulum arm is pulled which moves the pointer over the dial. At one point, one or two strands break and then many will slip and at the stage, there will not be any further movement of the pendulum. The pendulum will be prevented in falling back suddenly by the pawl which engages with the teeth over the serrated quadrant. At that place, the pointer also stops moving and indicates the maximum load on the dial. This load is called the strength of the lea. The lower jaw is then brought up and the lea is removed from the jaws.
You may also like: What is Fabric Pilling? Factors Responsible for Pilling


Nice article as well.
Hey there! I know this is kind of off-topic, but I’d figured I’d ask. Would you be interested in exchanging links or maybe guest authoring a blog post or vice-versa? My blog goes over a lot of the same topics as yours, and I believe we could greatly benefit from each other. If you happen to be interested, feel free to shoot me an e-mail. I look forward to hearing from you! Great blog by the way!
TY for this post, it has been very useful to me! Way simpler than other bloggers out there.
Please tell me more about your excellent articles
Sir
What will be the difference in result while using CRT and CRE principle for Lea testing, Which one is advisable
Plz Advice