An Overview of Devour or Burn Out Printing Technique
Last updated on August 28th, 2023 at 12:18 am
Definition of Devour Print
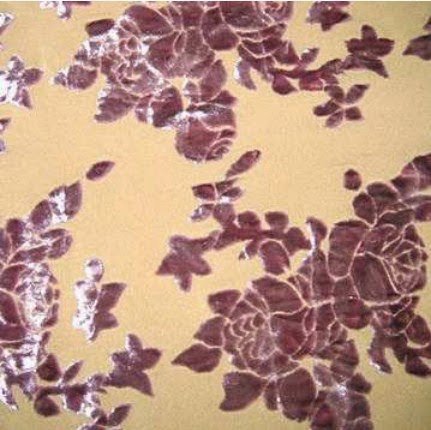
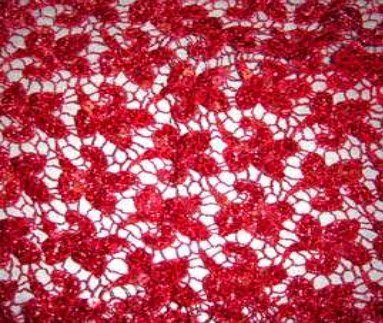
Devour (also known as ‘burn out’) is the removal of fibres from a fabric. Burn-out prints involve printing with a chemical substance that destroys the fiber in a designed pattern of print area. For successful effects, it is important that, there are different fibres present in both the warp and weft of the fabric. Or the cloth might fall apart!
Types of Devour Print
- Single component devour.
- Multi component devour.
Single Component Devour
- A hole in the fabric results where the chemical made contact with the fabric.
- Simulated eyelet embroideries are made with a 2-or-3 roller print, where one roller contains the fiber- destroying chemical and the other roller(s) prints a pattern simulating embroidery stitching.
Multi Component Devour
- Involves fabrics that are made from blended yarns, core-spun yarns, or fabric mixtures of two or more types of fibers.
- The burn-out print chemical destroys one fiber and leaves the others undamaged.
Common Styles
- Frame work: Single fibre is used and printed with a careful selection of design, whole shapes can be burned away, producing a delicate frame work.
- Floating thread effect: Devour resistant fibre is present in only the warp or weft.
- Multi layered effect: By layering different fabrics together – cotton and wool, cotton and polyester or silk and viscose. The fabrics are then stitched or bonded together in places so it is possible to burn away areas of the top cloth, revealing the bottom cloth, thus creating a multiple cloth.
- Color effect: By dyeing one or more fibre in a multi fibre cloth. E.g. a polyester cotton colored with a disperse dye will have a chalky look because the cotton has not taken up the dye. When the cotton is burnt out the full shade of the polyester will be revealed. This technique can be taken a stage further by cross dyeing the two fibres in contrasting dyes and colors.
Most Familiar Devours
Cellulose Devour
The removal of cellulose fibres (cotton, linen, viscose etc) from a mixed fibre woven/knitted fabric. E.g. silk/viscose velvet.
The degradation of cellulose fibres are achieved by the use of an acid donor such as aluminium sulphate or sodium hydrogen sulphate. With the application of heat the paste forms an acid that carbonises the cellulose printed areas.
Example- 01
Recipe 01:
Aluminium sulphate → 20 parts
Glycerine → 2 parts
Thickener → 60 parts Indalca
Water → 18 parts
Total → 100gms
Recipe 02:
70 gm solvitose powder
50 gm aluminium sulphate
20 gm tartaric acid
2 gms glycerol
400 ml water
Solvitose C5 is a carboxymethylated starch based thickener.
Print Sequence
- Dissolve the aluminium sulphate and tartaric acid in a little hot water. Add glycerin.
- Put solvates powder into 400 ml water into liquidizer and whiz.
- Add aluminium sulphate mixture to the liquidiser and whiz.
- Mix until a smooth syrupy mixture is achieved, leave the devour paste to stand for 30 minutes.
- Screen print the paste onto the fabric making sure it penetrates the fabric, usually six or eight pulls for a medium fabric should be enough.
- When using silk viscose velvet always print on the reverse side of the cloth rather than on top of the pile.
- The fabric is dried before being heat treated. If the print is not completely dry during this process it will not get hot enough to carbonize and the results will be poor.
- The fabric is then baked at 1700 C for 5 minutes or heat pressed at 1700 C for anything from 30 seconds to 2 minutes or ironed until the cellulose has carbonized, turning a brown – black color. Experimentation is required at this stage.
- The carbonized fibres are removed by gently rubbing the fabric in an open area.
- The fabric can then be washed in warm soapy water until the burnt out areas are removed.
- If a colored fabric is wanted the fabric can be dyed before or after the burn out process.
Cautions
- It is important at brushing stage to wear a mask, gloves and goggles as the fibres and chemical dust are irritants.
- Do not rub the fabric too hard as the fabric is brittle and holes are easily made.

Protein Devour
The removal of protein fibres (silk, wool etc) from mixed fibre woven/knitted fabric. E.g. Wool / Acrylic
Recipe 01:
Caustic soda (Sodium Hydroxide) → 30gms
Water → 19gms
Perminol KP → 1gm
Thickener → 50gms
Total → 100gms
Recipe 02:
400 ml water
60 gm solvitose powder
50 gm sodium hydroxide pellets (caustic soda) dissolved in 100ml water.
Print Sequence
- Add the granules to the cold water in a chemical resistant container and not the water to the granules.
- When cold, add the caustic soda solution to the thickener. Mix into a smooth paste.
- Follow the same steps as the cellulose devour recipe, i.e., printing, drying, carbonizing and washing out.
- After washing, the alkali in the fabric is then neutralized in a solution of 2 ml acetic acid per liter of water.
- Another way to carbonise the protein fibres is to steam the print for ten minutes rather than heating it. This will cause the the caustic solution to destroy the protein fibres in the printed areas.
- A stronger solution of caustic soda must be used for industrial method. Once the fabric is printed and dried it is steamed for 15 minutes until the protein fibres turn a yellow orange color.
Cautions
- Be careful with caustic dissolving. A great deal of heat and fumes are emitted at this stage.
- Take care when washing.
- Take care with caustic soda. It burns protein, you are protein! Wear gloves, face mask, eye goggles and apron.
Colored Devour Printing
- This process only works on synthetic/ natural fabrics.
- Dyes suitable for printing synthetic fabrics are mixed with a chemical that removes the natural fibres.
Recipes:
Disperse dye → 1-5gms
Carrier → 1gm
Water → 28 gms
Glycerine → 1gm
Aluminium sulphate → 15 gms
Total → 100gms
Printing Sequence:
↓
Dry
↓
Bake at 180 degrees for 5 minutes
↓
Wash with cold water
Different Burnout Agents
- Sodium dihydrogen phosphate: It is a virtually universal burn out agent for fabrics containing fibre mixtures with polyester. But cannot be used on fibre mixtures containing polyamide.
- Sulphuric acid: It is used as an extremely aggressive burn out agent (for the all over process).
- Sodium hydroxide solution: It is used to burn out the wool/silk components in mixtures with polyester or polyamide.
- Aluminium sulphate: It also gives good results when favorable conditions exist with regard to the substrate structure and composition. Aluminium sulphate must be used for fibre mixtures containing polyamide.
Jour Effects, Chemical Embroidery (Dyeing)
These styles are produced on fabrics composed of different types of fibres by the (local) action of chemicals capable of destroying a selected fibre followed by its subsequent removal.
Sequence
- saturation
- Mild drying
- Heating
- Final brushing out
Some Typical Examples
- Silk and cotton or viscose: In this case, aluminium sulphate or chloride is used to carbonize and dissolve out the latter component.
- Acetate/viscose: Mixtures the latter is dissolved out by boiling alkali.
- Polyester/cotton: A treatment in cold 70% sulphuric acid can be used to dissolve out the cotton in polyester/cotton fabrics (with no effect on the polyester).
Ombre
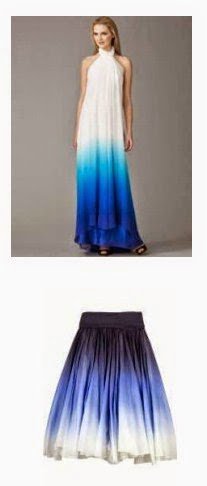
- The term usually refers to a garment that is monochromatic but has a graduated variation in the saturation of the color. A French word meaning “shade” or “shadow“.
- Also known as dip dyeing. Color bleeding, or gradated dyeing.
- An effect usually achieved by hand dipping fabric in dye so that it gradually goes from light to dark, or sometimes from one color to another.
- At high-end garments it lends itself well. True Ombré is a laboriously hand dipped wonder with fine gradations from top to bottom.
- On the low-end garments, it is simulated by printing, tie dyeing etc.
- Professional tie dyers have achieved somewhat of an Ombré look by pre-soaking a garment in Soda Ash and applying successively stronger solutions of color from top to bottom of the garment.
How to dye:
- First, the container
- Use a container, wider than the width of the shirt, scarf or dress you are dyeing.
- Deep enough as to hang it neatly in the dye bath and as to ease slowly lift it out without having it too wrinkled at the bottom.
- A pulling arrangement
- To be able to pull a measured portion of the fabric/garment straight up and out of the dyebath.
- At calculated intervals until gradually the entire garment is pulled out.
Dyeing:
- Dissolve all the ingrediens in the dyebat Have the dye bath thoroughly stirred with all ingredients (except dye) well dissolved.
- Premix required amount of dye separately in some water.
- Decide ahead of time how many layers you are going to have and how many inches each will be.
Dyeing
- Add a portion of thoroughly dissolved dye to the dye bath and stir. If 8 layers of color is decided, then add an 8th, etc.
- Carefully lower the pre-washed wet fabric into the dye bath.
- Allow the garment to be in the dye for a couple of minutes, then raise it upto desired interval, like 4 inches or whatever.
- Then stir in another portion of dye, this time allow more time than the previous.
- Raise it again, and repeat this until the bottom of the garment.
- With each layer you add some more dye and let it sit longer in between “raisings” than the last time.
- Once the garment is removed from the dyebath, rinse with cold water, then wash it in hot water and soap followed by a hot rinse and cold wash.
- If it is needed to go from one color to another, then simply pre-dye the whole garment with one color (a lighter color works well) then Ombré dye it with the second color.
Precautions
- Using enough water to lower the dye bath concentration to allow the garment to be fairly relaxed in the bath.
- Gently stirring the added dye so as not to disturb the garment too much, but so that the dye doesn’t “settle” and cause uneven lines in the folds of submerged fabric.
Alternatively

- One way to make it easier to get a smooth gradation is to start with color at the darkest and water level at the lowest and dipping the bottom part of your garment.
- After 5 or so minutes, (timing depends on how dark is needed) add water to the next “level” on the garment.
- Then slowly add the water bit by bit which leads to a smoother transition.


Awesome! I was looking for just this information. Thank you!
Most welcome…
Great content! Super high-quality! Keep it up!
Hello there.
Interesting information.
My father use to these Chemical old time.
Now time change my grandson ask me what is chemical of burnout for cotton /Polestar fabric. Ready to print past.
Please help me is there any ready to printing past.
Brand Name of chemical.
Regards
Solly Wada